
In this guide, we will learn firewalld basic concept, installation, command, and detail setup process in Centos.
In a nutshell, this is all but a short, point-to tutorial about firewalld for beginners. I use this as a cheat sheet note. [I had this as a cheat sheet in my personal note tool for a while. ]
Table of Contents
What is Firewall?
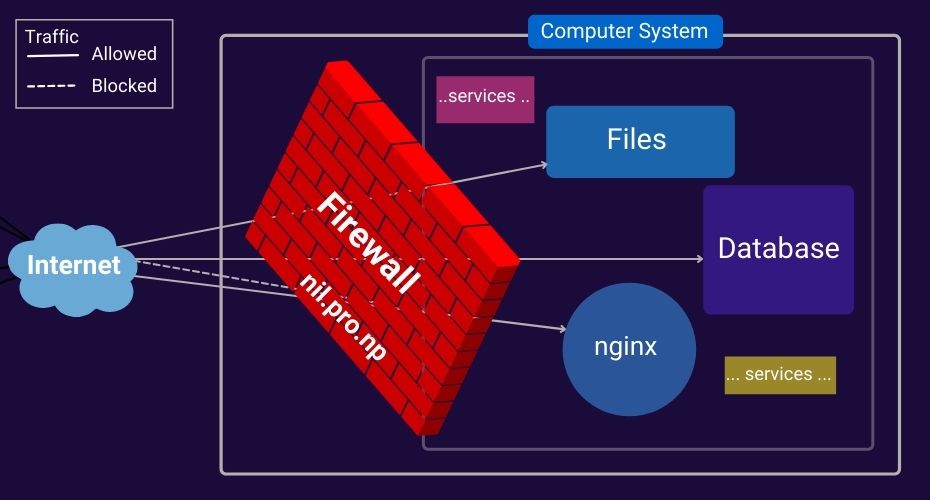
A firewall is a network security system that filters (permits or blocks) incoming & outgoing network traffic (data packets) based on a predefined set of security rules.
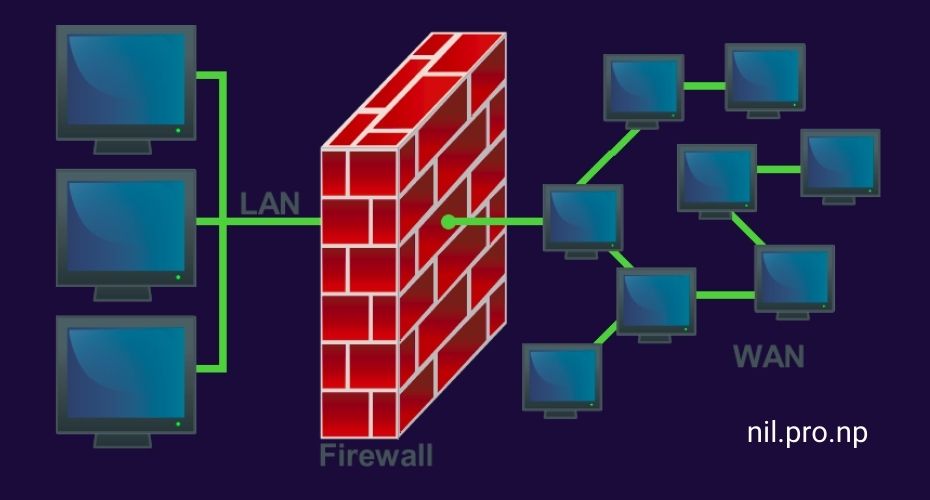
It acts as a barrier between a trusted internal network and an untrusted external network (Internet), thus monitors all traffic passing through it. And, it blocks all unwanted network traffic or connection.
A firewall can be dedicated hardware or hosted software. Firewalld is one of the popular firewall management tools.
Firewalld comes by default on the following Linux distributions:
- CentOS 7 and newer
- Fedora 18 and newer
- OpenSUSE Leap 15 and newer
- Red Hat Enterprise Linux 7 (RHEL) and newer
- SUSE Linux Enterprise 15 and newer
- Also, it can be installed on other distributions (like Ubuntu) as a package.
Basic Firewalld Concepts
FirewallD uses the zones and services. And, firewall-cmd command to configure firewalld.
firewall-cmd: This command is used to configure FirewallD.
–permanent: This flag is used to permanently save the rule configured using firewall-cmd otherwise it will be lost on system restart.
When using a permanent configuration, we must reload the configuration to use in the current session.
sudo firewall-cmd --reloadFirewall Zones
Firewall Zones are predefined sets of rules specifying what traffic should be allowed based on the level of trust we have in the networks our system is connected to. We can assign network interfaces and sources to a zone.
Below are the predefined zones provided by FirewallD in order from untrusted to trusted:
drop: All incoming connections are dropped without reply or notification.
block: All incoming connections are rejected with an icmp-host-prohibited or icmp6-adm-prohibited message.
public: For use in public places, untrusted networks. We can allow selected incoming connections on pre-configured service and port but we don’t trust other computers in the network.
external : For use on external networks when we are using the our computer(firewall) as a gateway or router. It is configured for NAT masquerading so that our internal network remains private but reachable.
internal : For use on internal networks when our system acts as a gateway or router. It is other side of the external zone, used for the internal portion of a gateway. Other systems on the network are generally trusted. Only selected other incoming connections are allowed.
dmz : Used for computers located in a demilitarized zone (DMZ). DMZ is isolated system that have limited access to our internal network. Only certain other incoming connections are allowed.
work : Used for work machines. Systems on the work network are generally trusted. Only selected other incoming connections are allowed.
home : Used on home environment. Systems on the home network are generally trusted. Only selected other incoming connections are allowed.
trusted : All systems on the network are trusted. All network connections are accepted.
Note: By default all out going connection are allowed.
Firewall services
Firewall Services are rules defined in the XML configuration file that describe the port and its associated protocol, name, description, and more. But, Ports and protocols are mandatory options in the service configuration file.
We can easily use same firewall services in different firewall rule/zone so that we don’t need to manually define the same thing again and again. Also, there are many predefined firewall services available in our system. For example, instead of writing port 22, TCP protocol every time in every zone manually for SSH rule, we can use ‘ssh’.
And, if we need to modify any firewall parameter later, we can simply edit one configuration file. And all changes will be automatically applied everywhere.
How to install firewalld in CentOS?
Starting from CentOS 7, FirewallD is the default firewall management tool in CentOS operating System. So, most of the time FirewallD comes pre-installed with the default CentOS 7, CentOS 8 image.
Check, whether FirewallD is already installed on our system or not by running the below command:
systemctl status firewalld
//or
sudo firewall-cmd --state
It will display firewalld status indicating whether firewalld is found in the system or not.
If it is already in the system, we can skip the installation part.
Installing Firewalld
sudo yum install firewalldFirewalld service is disabled by default. check the status with:
sudo firewall-cmd --stateCommand to find Firewalld configuration details:
To get the configured default zone:
sudo firewall-cmd --get-default-zoneThe default zone in the firewalld configuration is the public zone. However, we can change the default zone. All service/ports configured without specifying zone will be assigned to the default zone.
To get a list of all available zones:
sudo firewall-cmd --get-zonesTo check what zones are used by our network interface(s):
sudo firewall-cmd --get-active-zonesAll network interfaces are assigned the default zone initially.
To get the zone configuration settings of a specific zone:
sudo firewall-cmd --zone=<zone-name> --list-all
//To get conf of public zone:
sudo firewall-cmd --zone=public --list-all
To get the configurations of all available zones:
sudo firewall-cmd --list-all-zonesTo get a list of all available services:
sudo firewall-cmd --get-servicesTo check all currently active service in a specific zone:
sudo firewall-cmd --zone=public --list-servicesTo check all currently active ports in a specific zone:
sudo firewall-cmd --zone=public --list-portsTo check the permanent configuration add –permanent in the above command
To check current Rich Rules:
sudo firewall-cmd --zone=<zone-name> --list-rich-rulesRich rule is a feature of firewalld that allows us to add other options to create more sophisticated firewall rules.
To check source address in zone:
firewall-cmd --permanent --zone=<zone-name> --list-sourcesHow to configure firewalld before enabling it?
We can use firewall-offline-cmd to configure firewalld before enabling it.
Note: firewall-offline-cmd is not recommended use when firewalld is running instead use firewall-cmd. firewall-cmd works only with active firewalld.
This is useful if we have changed the SSH port before configuring the firewall. By default, only standard ssh (port 22) and dhcpv6-client will be allowed.
If you are working on the cloud from an SSH connection and you have enabled a different SSH port other than port 22 then directly enabling/starting the firewall will disconnect your existing SSH connection. You won’t be able to access our system.
So, we need to allow the changed custom-ssh port in the firewall before enabling it. However, normal firewall-cmd will not work as firewalld is inactive.
In that case, we can use firewall-offline-cmd instead of firewall-cmd as follow.
Configuration added using firewall-offline-cmd is permanent and it doesn’t take –permanent flag.
To add custom ssh port 4545 to firewall allow list:
sudo firewall-offline-cmd --zone=public --add-port=4545/tcpor we can create a new ssh service and add to the rule like
sudo firewall-offline-cmd --zone=<zone-name> --add-service=<new-ssh-service-name>To check service and ports in allow list before enabling
sudo firewall-offline-cmd --zone=public --list-servicessudo firewall-offline-cmd --zone=public --list-portsNow, start firewalld and use the normal firewall-cmd command.
To start the FirewallD service:
sudo systemctl start firewalldAlso Read
- Blogging Tutorials Series for Beginner-Free
- CSS Guide: Flexbox Cheatsheet
- How to set up a cron job in Linux?
How to configure firewalld in CentOS?
To start the FirewallD service:
sudo systemctl start firewalldTo enable the firewalld on boot so that it automatically starts on restart/shutdown:
sudo systemctl enable firewalldNow, we have running firewall. So, lets configure it.
To permanently add service in allow list of in firewall (example HTTP):
sudo firewall-cmd --permanent --zone=<zone-name> --add-service=<service-name>
//To allow incoming HTTP traffic (on port 80) for the interfaces in the public zone.
sudo firewall-cmd --permanent --zone=public --add-service=http
To add service for the current session only:
sudo firewall-cmd --zone=<zone-name> --add-service=<service-name>
//To allow incoming HTTP traffic (on port 80) for the interfaces in the public zone for current session only.
sudo firewall-cmd --zone=public --add-service=http
Similarly, we can allow any service by using registered firewall service name like HTTPS, SMTP, NTP, MySQL etc.
To allow incoming HTTPS traffic (on port 443) for the interfaces in the public zone:
sudo firewall-cmd --permanent --zone=public --add-service=httpsIn a normal web server, we only need to add HTTP, HTTPS, and SSH connections.
To change the default zone:
sudo firewall-cmd --set-default-zone=<zone-name>
//To set home zone as a default zone
sudo firewall-cmd --set-default-zone=home
To change the zone of an Interface:
sudo firewall-cmd --zone=<zone-name> --change-interface=<interface-name>
//To assign work zone to eth1 interface
sudo firewall-cmd --zone=work --change-interface=eth1
To remove service from firewall:
sudo firewall-cmd --zone=<zone-name> --remove-service=<service-name> --permanent
//to remove http
sudo firewall-cmd --zone=public --remove-service=http --permanent
To add port and protocol for new services [without creating firewall service (XML configuration)]
sudo firewall-cmd --permanent --zone=<zone-name> --add-port=<port-number>/<protocol>
//To add port 4545
sudo firewall-cmd --permanent --zone=public --add-port=4545/tcp
To remove port from firewall:
sudo firewall-cmd --zone=<zone-name> --remove-port=<port-number>/<protocol> --permanent
//to remove port 4545
sudo firewall-cmd --zone=public --remove-port=4545/tcp --permanent
To create a New Zone:
sudo firewall-cmd --permanent --new-zone=<new-zone-name>To add an IP address or range of addresses to a zone use –add-source=IP
//For example, to associate the source IP 10.10.10.0/24 to ‘testing’ zone.
firewall-cmd --permanent --zone=testing --add-source=10.10.10.0/24
When traffic/connection from these sources enters the systems, the zone that we have associated will be applied to that traffic.
To remove an IP address or range of addresses from a zone
firewall-cmd --permanent --zone=testing --remove-source=10.10.10.0/24–remove-source=IP works in the same way as –add-source, except that it is used to remove a source IP address or address range that has been added to a zone.
To stop firewalld:
sudo systemctl stop firewalldTo disable firewalld:
sudo systemctl disable firewalldStop command stops the firewall for current execution and doesn’t affect the next execution (after restart). Disable command disable the firewall from running from the next restart.
How to create a new FirewallD service?
We can create a new firewall service by creating new XML files in /etc/firewalld/services by copying existing XML file from /usr/lib/firewalld/services and changing respective details.
The name of the XML file is what we will use in firewall configuration as a firewall service.
To create a new firewalld service for SSH with a custom port:
Let’s create a new service named custom-ssh for SSH with a changed custom port.
- First, copy /usr/lib/firewalld/services/ssh.xml to the /etc/firewalld/services/custom-ssh.xml
sudo cp /usr/lib/firewalld/services/ssh.xml /etc/firewalld/services/custom-ssh.xml- Now, change the port from 22 to our custom port 4545 in the custom-ssh.xml file.
sudo vi /etc/firewalld/services/custom-ssh.xml<?xml version="1.0" encoding="utf-8"?>
<service>
<short>Custom SSH</short>
<description>Service for SSH with custom port 4545</description>
<port protocol="tcp" port="4545"/>
</service>- Reload firewall to get access to this new service.
sudo firewall-cmd --reload- Check new service on the list.
sudo firewall-cmd --get-serviceNow, our new service custom-ssh is ready to use.
Port Forwarding with Firewalld
To use port forwarding, first enable masquerading for the desired zone using the –add-masquerade switch.
For example to enable masquerading for external zone:
sudo firewall-cmd --zone=external --add-masqueradeForward traffic from one port (8585) to another port (80) on the same server
sudo firewall-cmd --permanent --zone=external --add-forward-port=port=8585:proto=tcp:toport=80Allow all ssh connection (port 22) from host with IP X.X.X.X
sudo firewall-cmd --zone=<zone-name> --add-rich-rule 'rule family="ipv4" source address=<IP X.X.X.X> port port=22 protocol=tcp accept'
How to configure a firewall for the webserver in centos 7, 8?
On webserver, we want to use the SSH, HTTP, and HTTPS services. Standard SSH will be allowed by default and we only need to add HTTP and HTTPS.
sudo systemctl start firewalld // start firewall
sudo systemctl enable firewalld // enable firewall
sudo firewall-cmd --permanent --zone=public --add-service=http //add http
sudo firewall-cmd --permanent --zone=public --add-service=https //add https
sudo firewall-cmd --reload
Now, standard ports for SSH, HTTP, and HTTPS services are allowed in the firewall. But, we would like to use custom port 4545 for SSH. so first add this port or create a new service with this port and add this service.
sudo firewall-cmd --permanent --zone=public--add-service=custom-ssh //add custom-ssh service that have port 4545 configured
//or directly add port port 4545
sudo firewall-cmd --permanent --zone=public --add-port=4545/tcp
sudo firewall-cmd --reload
Then, change the port on SSH service to custom port 4545 and remove standard SSH service from firewall after checking SSH with custom port.
[Before blocking the standard port, verify SSH to a custom port, otherwise, you may get kicked out from your system. And, you may need to reset the whole system to access it again. Actually, I have been in this situation and had lost some recent update]
sudo firewall-cmd --zone=public --remove-service=ssh --permanent
sudo firewall-cmd --reload
Verifying all configuration:
//to check permanent configuration
sudo firewall-cmd --list-port --permanent --zone=public
sudo firewall-cmd --list-services --permanent --zone=public
//current session config check
sudo firewall-cmd --list-port --zone=public
sudo firewall-cmd --list-services --zone=public
How to white-list Cloudfare IP for HTTP, HTTPS in firewalld on CentOS 8, 7?
Let’s add IP address of Cloudflare by making a separate Cloudflare zone. This setup also helps to limit HTTP connection only from Cloudflare and reject the connection from anywhere.
List of all Cloudflare IPs is available in https://www.cloudflare.com/ips/. Here, we will add Cloudflare IP in cloudflare zone by creating a loop in a script for one time. These IP may changes in the future so it’s better to automate with cron job for regularly check and update.
//To create a new Cloudflare zone
sudo firewall-cmd --permanent --new-zone=cloudflare

// switch to root user
sudo su -

//create cloudflare_ip script
echo '#\!/bin/bash' > ./cloudflare_ip.sh
for i in $(curl "https://www.cloudflare.com/ips-v4"); do echo "firewall-cmd --zone=cloudflare --add-source=$i --permanent" >> ./cloudflare_init.sh; done
for i in $(curl "https://www.cloudflare.com/ips-v6"); do echo "firewall-cmd --zone=cloudflare --add-source=$i --permanent" >> ./cloudflare_init.sh; done

//check if script before executing
touch ./cloudflare_init.sh

chmod +x ./cloudflare_init.sh

./cloudflare_init.sh

//Enabling http/https access from cloudflare IP
firewall-cmd --zone=cloudflare --permanent --add-service=http
firewall-cmd --zone=cloudflare --permanent --add-service=https

//Removing http/https access from public internet
firewall-cmd --zone=public --permanent --remove-service=http
firewall-cmd --zone=public --permanent --remove-service=https
firewall-cmd --reload

//Check and verfiy firewall rule in both public and cloudflare zone
firewall-cmd --zone=public --list-all
firewall-cmd --zone=cloudflare --list-all
Also, don’t forget to add your Home/Office IP on the firewall to allow SSH.
More Resources on FirewallD.
- FirewallD Official Documentation
- FirewallD – Fedora Wiki
- Fedora Documentation/Security guide/Using Firewalls
- RedHat Documentation/Security Guide/Using Firewalls
If you have any confusion following this tutorial or any topics on this Nil blog, don’t hesitate to ask in the comment section. You can also reach me on Twitter.
Do you also work with iptables?
I used to use iptables. Now, most of the systems I work on are the latest CentOS or Ubuntu. And, both these have better firewall tools; firewalld and UFW.