
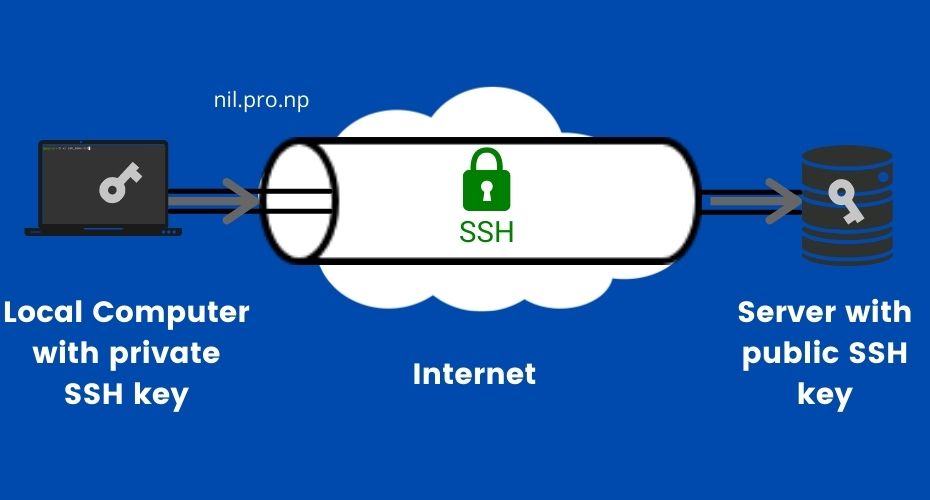
The SSH is a cryptographic network protocol for operating network services securely over an unsecured network. It stands for Secure Shell. Mainly used to remote login, secure file transfer (sFTP).
Table of Contents
How to generate a new SSH key in Linux?
- Open Terminal.
- Enter the below command. (RSA Key)
ssh-keygen -t rsa -b 4096 -C "youremail@gmail.com"Here this email part is just a comment to label key, you can replace email with your email address or any text you like.
This generates a 4096-bit RSA key, we can use 2048 also.
- Using ED25519 key (This is preferred over RSA key)
ssh-keygen -t ed25519 -C "youremail@gmail.com"- Now, enter a location to save ssh key file on your computer. Press Enter to save in the default location.
- Enter passphrase. It is used to encrypt your SSH key.
This is a password that will be asked every time when you use this key. Press Enter not to have any password in the SSH key.
Note: ED25519 is more robust and secure than the RSA key, so I recommend using ED25519. Also, it’s a good idea to protect your SSH key with a password so that hackers can’t access your server immediately even after they get access to your private key.
How to update passphrase (password in SSH key)?
Enter the following command in the terminal to change the password, it will ask your old password before giving the option to set a new one.
ssh-keygen -p -f /path/to/ssh_keyHow to check already generated SSH keys?
Open Terminal and, enter the below command.
ls -al ~/.sshThis list the all file inside the .ssh folder in the user home (default location).
How to connect to the server using SSH key?
- Copy your public key and paste it on ~/.ssh/authorized_keys file in the remote server.
- This can be done manually or
- We can directly add our key to ~/.ssh/authorized_keys file of the remote server. Enter the below command local computer terminal..
ssh-copy-id -i ~/path/to/privatekey user@remote-server-ipHere your public key should be in the same directory with the name privatekey name and .pub at the end.
- Now, Enter the below command in your local computer terminal to connect to your remote server with an SSH connection.
ssh -i /path/to/your/privatekey user@remote-server-ipUse your appropriate private key name/path, remote server user name, and server IP.
Note: if you have your ssh private/public key in the default location then you don’t need -i flag and path to the key.
Also, If your computer doesn’t have SSH (password-based) already enabled, you may need to add a firewall rule to allow SSH connection.
How to add our SSH key to ssh-agent (SSH authentication agent)?
ssh-agent is a key manager for SSH. ssh-agent holds our keys and certificates in memory, unencrypted and ready for use by ssh in the background.
So, we only need to enter passphrase once. Otherwise, we will need to retype the passphrase on each connection.
- First, start the ssh-agent in the background.
eval "$(ssh-agent -s)"- Add the SSH private key to the ssh-agent.
ssh-add ~/.ssh/id_rsaThis ssh-agent and ssh-add command allow the user to use any number of servers, spread across any number of organizations, without having to type in a password every time when moving between servers.
This is commonly used by system administrators to move among the machine they administer.
- To check ssh key added into ssh-agent
ssh-add -LHow to Fix the SSH Error “sign_and_send_pubkey: signing failed for ED25519 “.ssh/id_ed25519″ from agent: agent refused operation Permission denied (publickey).”?
This is a common error we face when we copy the SSH key from another computer and try to connect with the server. This is most of the due to the permission of the SSH key file.
I face this annoying problem when I change my system from Ubuntu to Pop!_OS. I spent almost a day troubleshooting this issue.
Error Message: “sign_and_send_pubkey: signing failed for ED25519 “.ssh/id_ed25519″ from agent: agent refused operation Permission denied (publickey).”
When you copy a file in the system, the file loses its permission and is wide open to everyone. SSH key being a sensitive door to system, Linux tries to protect the user from unauthorized use of SSH key.
To check it, manually add the SSH key to ssh-agent. It will show
“Permissions 0777 for ‘/ssh/id_ed25519’ are too open.
It is required that your private key files are NOT accessible by others.
This private key will be ignored.”
Solution: To solve this issue change the permission of the SSH key file so that only the key owner can read/write.
cd to/key/location #Go to SSH key file location
sudo chmod 400 id_ed25519 id_ed25519.pub # To make it read only
//or
sudo chmod 600 id_ed25519 id_ed25519.pub # To make it read/write only
Actually, it turns out to be a security feature of SSH.
SSH Agent Forwarding
SSH agent forwarding is a mechanism whereby an SSH client allows an SSH server to use the local ssh-agent on the server, the user logs into as if it was local there.
In simple terms, SSH agent forwarding allows us to use our local SSH keys on a remote server/host without copying or moving them to a remote server.
For a scenario, when you are working on a remote server, and you want to git pull code that you’re storing on Github, Gitlab. And, you want to use SSH authentication for Github/Gitlab, but your private keys are on your local machine.
One method is copying private keys from the local machine to the server and connecting to GitHub. If we need to configure multiple machines then we need to repeat the whole process in each machine very tedious.
Also, it’s dangerous to store our personal private keys in the remote server, anyone who has access to our remote server [ if anyone/hacker grants access] can retrieve our private keys and can access our other host/machines as well.
To solve this problem, we use SSH agent forwarding in our local machine, then we can directly connect to GitHub from the server like we are doing from the local machine.
How does SSH Agent Forwarding work?
To explain, SSH agent forwarding process here I will take the same example of connecting to Github from a remote server.
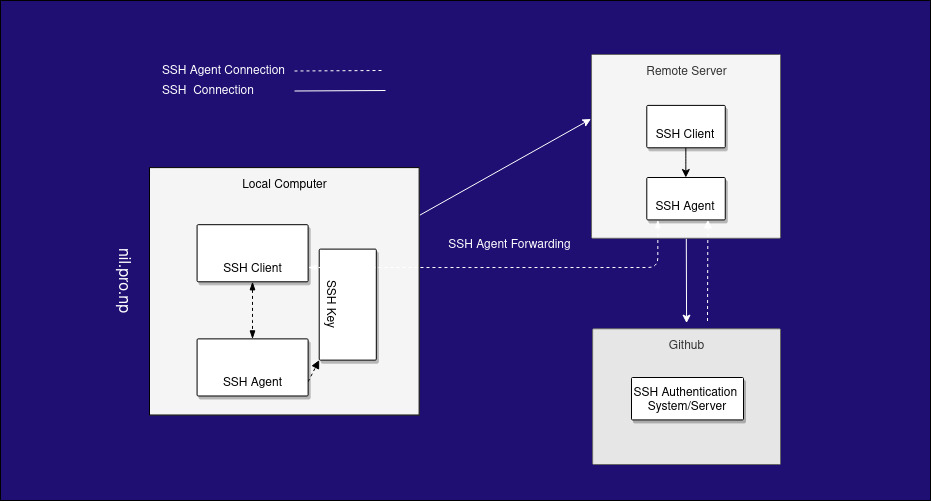
When you try to pull code from Github in a remote server with SSH authentication, Github will ask the remote server for authentication verification. In normal cases, the SSH agent responds with key verification using the private key, but in the case of SSH forwarding, it will forward this request to the local computer [SSH client that originally contacted the server] then the SSH Agent of the local computer responds with verification message. When Github gets the message, it verifies the request and lets us pull the code.
Steps to establish SSH Agent Forwarding
We can establish SSH Agent Forwarding in two ways:
Method 1: Editing ssh config file.
Add below code in ~/.ssh/config file in local machine.
Host ServerIP
  ForwardAgent yes
Now, our SSH agent forwarding will work next time in a normal ssh connection.
Method 2: Passing A flag in the request. This method is useful if you only need to forward the SSH agent for one time.
Add -A flag when doing SSH to the server like below:
ssh -A user@ServerIPTo test the connection from a remote server
#for checking ssh connection with Github from remote server, type this in remote server terminal.
ssh -T git@github.com
Also Read:
- Blogging Tutorials Series for Beginner [Free]
- CSS Guide: Flexbox Cheatsheet
- How to set up a cron job in Linux?
If you have any confusion following this tutorial or any topics on this Nil blog, don’t hesitate to ask in the comment section. You can also reach me on Twitter.